Python, R, Scala and Julia in one Notebook
Use R, Julia, Scala or Python? The answer is: Yes! How to create versatile environment, in which different languages are available and able to communicate with each other? Without changing program you work in and where data may be passed between specific structures characteristic for the language? This post will show you how to do it with four most powerful languages used in Data Science: Python, R, Scala and Julia.
Introduction
It is hard to choose best language for data analysis, especially if you are beginner and do not want to go into details about strengths and weaknesses of particular solutions. Should I choose R or Python (2 or 3), maybe Julia would be faster? What should I use to work with large data sets? My answer is: use what you can! Take the best you can from several languages and make it work. This post will show you how.
Use what you can! Take the best you can!
I have chosen four most powerful languages used in Data Science and Big Data analysis, which should give you broadest span of accessible technologies and speed up development or data analysis. Current versions of chosen software:
| Language | Version | |
|---|---|---|
| Python 2 | 2.7.13 | |
| Python 3 | 3.6.1 | |
| R | 3.4.0 | |
| Julia | 0.7.0 | |
| Scala | 2.12.1 |
Procedure
I will follow this procedure to prepare work environment:
- installing Python interpreter
- installing R language
- installing Julia language compiler
- installing Scala or sbt compiler
- installing additional jupyter kernels:
So my goal is to install Python, Scala, Julia and R on working machine. Additionally to run notebooks in languages other than Python I need to install specific middle-ware called kernels.
First let’s grab necessary tools - compilers and interpreters for each language (linked in table above). All languages presented here are multi-platform and can be installed on Windows, Linux and Mac OS machines. Since my working system is Fedora 25 I will describe install procedures for this OS. Debian based Linux distributions do not differ much from Red Hat family (except using different package manager and repos). Windows versions have convenient installers and installation process is trivial. If necessary, I will place link to the windows installer in each section.
Python interpreter
In all Linux distributions Python is available “out of the box”. Unfortunately in many cases default Python is still 2.7 branch. It should be mentioned, that 2.7 is very old and it is being slowly depreciated. It is last supported branch from 2.x family and it’s support will drop in 2020 (see: PEP 373). There will be no official bug fixes after that date. Additionally most of the currently used libraries are ready to run at least 3.5 version. Unless you have some obscure dependency, there is no excuse not to use Python 3. Older version is included here just for to demonstrate how to manage different Python versions in isolated environments.
There is no excuse not to use Python 3 anymore. Grab it! Use it!
I assume you have basic knowledge of Python flavors available today and their strengths and weaknesses. In this tutorial I will use Python 3 running on Fedora 25 workstation.
Moreover I have chosen specific distribution of Python, prepared by Continuum Analytics called Anaconda. It is the most comprehensive and free bundle of Python software dedicated to Data Science.
I strongly recommended to use Anaconda distribution, which will install Python interpreter, the Jupyter Notebook, and several other packages commonly used in data science and this tutorial. If you choose Anaconda 3, your interpreter will be of version 3.6 (current version) or higher (3.7 alpha is already available).
I will just follow instructions from installation page and simply execute downloaded script:
[mdyzma@devbox mdyzma]$ wget https://repo.continuum.io/archive/Anaconda3-4.3.1-Linux-x86_64.sh
--2017-04-23 19:36:37--  https://repo.continuum.io/archive/Anaconda3-4.3.1-Linux-x86_64.sh
Resolving repo.continuum.io (repo.continuum.io)... 104.16.18.10, 104.16.19.10, 2400:cb00:2048:1::6810:130a, ...
Connecting to repo.continuum.io (repo.continuum.io)|104.16.18.10|:443... connected.
HTTP request sent, awaiting response... 200 OK
Length: 497343851 (474M) [application/x-sh]
Saving to: 'Anaconda3-4.3.1-Linux-x86_64.sh'

Anaconda3-4.3.1-Linux-x86_64.sh     100%[==========================================>] 474.30M  14.1MB/s in 34s

2017-04-23 19:37:12 (13.8 MB/s) - 'Anaconda3-4.3.1-Linux-x86_64.sh' saved [497343851/497343851]
Script contains all binaries and weights nearly 475 MB. After executing, you should see Anaconda installer:
[mdyzma@devbox mdyzma]$ bash Anaconda3-4.3.1-Linux-x86_64.sh

Welcome to Anaconda3 4.3.1 (by Continuum Analytics, Inc.)

In order to continue the installation process, please review the license
agreement.
Please, press ENTER to continue
>>>
Automatic process will guide you through installation. You don’t have to run installer as a root, unless you want it to be installed for all users. In that case you need sudo privilege to install it in some globally accessible location like /opt/anaconda3 and append /etc/profile with the location of the interpreter export PATH=/opt/Anaconda3/bin:$PATH. This will make Python change system-wide. If you run it with normal user privileges it will choose your user’s home directory and place it in /home/<user>/anaconda3. Installer will install bunch of python packages including MKL optimizations (Math Kernel Library), numpy, pandas, matplotlib, scikit-learn and Jupyter - just to name few. Nearly 200 packages grouped together to make your life easier. To get list of the packages execute this command: conda list | wc -l. Anyway lets continue with installation…
PREFIX=/home/mdyzma/anaconda3
installing: python-3.6.0-0 ...

Python 3.6.0 :: Continuum Analytics, Inc.
creating default environment...
installation finished.
Do you wish the installer to prepend the Anaconda3 install location
to PATH in your /home/mdyzma/.bashrc ? [yes|no]
>>>yes

Prepending PATH=/home/mdyzma/anaconda3/bin to PATH in /home/mdyzma/.bashrc
Answering yes will make Anaconda’s python your default interpreter. Sometimes installer may be a little bit outdated. Restart terminal, or source .bashrc and upgrade Python. You can do it with all installed packages using single command: conda update --all; or just interpreter itself: conda update python.
[mdyzma@devbox mdyzma]$ conda update python
Fetching package metadata .........
Solving package specifications: .

Package plan for installation in environment /home/mdyzma/anaconda3:

The following packages will be UPDATED:

    anaconda: 4.3.1-np111py36_0 --> custom-py36_0
    conda:    4.3.14-py36_0     --> 4.3.17-py36_0
    python:   3.6.0-0           --> 3.6.1-0

Proceed ([y]/n)? y
After that you should have brand new Python 3.6.1 as your main system interpreter. To confirm it type conda info or simply try to run python interpreter in your terminal.
Conda command should result in displaying detailed information about current Anaconda installation:
[mdyzma@devbox mdyzma]$ conda info
    Current conda install:

                   platform : linux-64
              conda version : 4.3.17
           conda is private : False
          conda-env version : 4.3.17
        conda-build version : not installed
             python version : 3.6.1.final.0
           requests version : 2.12.4
           root environment : /home/mdyzma/anaconda3  (writable)
        default environment : /home/mdyzma/anaconda3
           envs directories : /home/mdyzma/anaconda3/envs
                          /home/mdyzma/.conda/envs
              package cache : /home/mdyzma/anaconda3/pkgs
                          /home/mdyzma/.conda/pkgs
               channel URLs : https://repo.continuum.io/pkgs/free/linux-64
                          https://repo.continuum.io/pkgs/free/noarch
                          https://repo.continuum.io/pkgs/r/linux-64
                          https://repo.continuum.io/pkgs/r/noarch
                          https://repo.continuum.io/pkgs/pro/linux-64
                          https://repo.continuum.io/pkgs/pro/noarch
                config file : None
               offline mode : False
                 user-agent : conda/4.3.17 requests/2.12.4 CPython/3.6.1 Linux/4.9.27-moby Fedora/25 glibc/2.24
                    UID:GID : 0:0
Running python should expose interpreters REPL:
[mdyzma@0devbox mdyzma]$ python
Python 3.6.1 |Anaconda custom (64-bit)| (default, May 11 2017, 13:09:58)
[GCC 4.4.7 20120313 (Red Hat 4.4.7-1)] on Linux
Type "help", "copyright", "credits" or "license" for more information.
>>>
Windows users have to follow simple next,next installer prepared by Continuum. It can be downloaded here.
R language
Fedora users can install R from the standard Fedora repository using:
[mdyzma@devbox mdyzma]$ sudo dnf install RThe RPM of R is a meta package, which will install following components:
- R-core User RPM
- R-core-devel Developer RPM containing header files
- R-java RPM to ensure that R is configured for use with Java
- libRmath Standalone R math library
- libRmath-devel Header file for the standalone R math library
According to CRAN manual Fedora will also require developer versions, which contain header files necessary to properly install other R packages and to compile them from the source. Windows users have simple installer at their disposal.
Julia compiler
A Copr repository is provided for Fedora users. To install Julia just run:
[mdyzma@devbox mdyzma]$ sudo dnf copr enable nalimilan/juliaBleeding edge version of Julia is held in separate repository, which can be added with this command: sudo dnf copr enable nalimilan/julia-nightlies. I decided to install nightly Julia release. Adding any of mentioned above results in:
[mdyzma@devbox mdyzma]# dnf copr enable nalimilan/julia-nightlies

You are about to enable a Copr repository. Please note that this
repository is not part of the main Fedora distribution, and quality
may vary.

The Fedora Project does not exercise any power over the contents of
this repository beyond the rules outlined in the Copr FAQ at
<https://fedorahosted.org/copr/wiki/UserDocs#WhatIcanbuildinCopr>, and
packages are not held to any quality or security level.

Please do not file bug reports about these packages in Fedora
Bugzilla. In case of problems, contact the owner of this repository.

Do you want to continue? [y/N]: y
Repository successfully enabled.
After that you can easily install specific build of Julia compiler:
[mdyzma@devbox mdyzma]$ sudo dnf install julia
Password:

Copr repo for julia-nightlies owned by nalimilan                                                                                                              53 kB/s |  67 kB     00:01
Dependencies resolved.
=========================
... List of packages ...

Transaction Summary
=========================
Install  59 Packages

Total download size: 60 M
Installed size: 260 M
To verify either type julia --version or simply try to run Julia REPL:
[mdyzma@devbox mdyzma]$ julia
   _       _ _(_)_     |  A fresh approach to technical computing
  (_)     | (_) (_)    |  Documentation: https://docs.julialang.org
   _ _   _| |_  __ _   |  Type "?help" for help.
  | | | | | | |/ _` |  |
  | | |_| | | | (_| |  |  Version 0.7.0-DEV.401 (2017-05-30 17:07 UTC)
 _/ |\__'_|_|_|\__'_|  |  Commit e3794ee* (2 days old master)
|__/                   |  x86_64-redhat-linux

julia>

julia> 2+2
4

julia>
Scala / sbt
Scala compiles to Java byte-code using Java Virtual Machine. Therefore before using it, JRE or JDK must be installed in the system.
Install Oracle Java JDK/JRE
Download JRE or JDK from Oracle www. Select one of the available options (i.e. download JRE -> jre-8u131-linux-x64.rpm or download JDK -> jdk-8u131-linux-x64.rpm). What is the difference? JRE stands for Java Runtime Environment , which covers all end-users needs if it comes to run software written in Java. JDK is developers environment (Java Developers Kit) containing JRE with additional tools supporting Java programs development and debugging. Installation must be done with administrator privileges.
[mdyzma@devbox mdyzma]$ su -
Password:

[root@devbox mdyzma]# rpm -Uvh /home/mdyzma/jdk-8u131-linux-x64.rpm
… or:
[mdyzma@devbox mdyzma]$ su -
Password:

[root@devbox mdyzma]# rpm -Uvh /home/mdyzma/jre-8u131-linux-x64.rpm
Please remember to change paths to downloaded files. Windows users should choose msi installer and follow java installer instructions.
This step may be skipped for “nix” operating systems, since dnf or apt will manage dependences for you and install appropriate openJDK environment during Scala installation.
Install Scala
Installing Scala is straight forward. Windows users have typical installer. On fedora and other “nix” systems Scala is part of official repository and can be installed with single command:
Scala compiles to Java byte-code
[mdyzma@devbox mdyzma]$ dnf install scalaWhen process is finished you can check your installation simply by trying to use Scala REPL:
[mdyzma@devbox mdyzma]$ scala
Welcome to Scala version 2.10.4 (OpenJDK 64-Bit Server VM, Java 1.8.0_131).
Type in expressions to have them evaluated.
Type :help for more information.

scala> 2+2
res0: Int = 4
It works! Perfect!
You may notice, that scala from this repo is little bit outdated. Don’t worry. It will be updated when used with sbt build-tool.
When you write small programs which consist of only one, or just two source files, then it’s easy enough to compile those source files by typing scalac MyProgram.scala in the terminal. Scalac is name of Scala compiler program. But when project gets bigger, with dozens or maybe even hundreds of source files, then it becomes too tedious to compile all those source files manually. You start to think: “There must be a better way.”
C/C++ programmers use make tool. For programs compiling to Java byte-code there is sbt. It is a general purpose build tool written in Scala. In the next section I will describe its installation.
Install sbt
As I mentioned before manual compilation of complex project with hundreds of files is nearly impossible. Not mentioning managing all dependencies required by hundreds of files. Build-tools, such as sbt (Simple Build Tool), can automate this time consuming and tedious process. It will manage compiling all source files and dependencies for you. This means that if you need to use some libraries written by others, sbt can automatically download the right versions of those libraries and include them in your project. Moreover you can compose automatic unit-tests which can also be run by build-tool. Sbt will also provide some boilerplate code to automate starting new projects in Scala.
As usual Windows users will use sbt installer. “Nix” users will have to add official repository to their system. Sbt binaries are published to Bintray repository, and conveniently Bintray provides an RPM variant for Fedora. Super user privileges are required.
[mdyzma@devbox mdyzma]$ su -
Password:

[root@devbox mdyzma]# curl https://bintray.com/sbt/rpm/rpm | tee /etc/yum.repos.d/bintray-sbt-rpm.repo
  % Total    % Received % Xferd  Average Speed   Time    Time     Time  Current
                                 Dload  Upload   Total   Spent    Left  Speed
100   162    0   162    0     0    183      0 --:--:-- --:--:-- --:--:--   186
#bintray--sbt-rpm - packages by  from Bintray
[bintray--sbt-rpm]
name=bintray--sbt-rpm
baseurl=http://dl.bintray.com/sbt/rpm
gpgcheck=0
repo_gpgcheck=0
enabled=1
Once Bintray repository is added you can install latest sbt using package manager:
[root@devbox mdyzma]# dnf install sbtSbt is a tool that runs from the project folder. When it starts it will try to read build.sbt file which should contain information about project. You can also use sbt creator to start new project. To test sbt I will create test directory and run project creator:
[mdyzma@devbox mdyzma]$ mkdir test
[mdyzma@devbox mdyzma]$ cd test/ && sbt new sbt/scala-seed.g8
WARN: No sbt.version set in project/build.properties, base directory: /home/mdyzma/test
[warn] Executing in batch mode.
[warn]   For better performance, hit [ENTER] to switch to interactive mode, or
[warn]   consider launching sbt without any commands, or explicitly passing 'shell'
[info] Set current project to test (in build file:/home/mdyzma/test/)

Minimum Scala build.

name [My Something Project]: hello

Template applied in ./hello

[mdyzma@devbox test]$ cd .. && tree test/
test/
|-- hello
|   |-- build.sbt
|   |-- project
|   |   |-- Dependencies.scala
|   |   `-- build.properties
|   `-- src
|       |-- main
|       |   `-- scala
|       |       `-- example
|       |           `-- Hello.scala
|       `-- test
|           `-- scala
|               `-- example
|                   `-- HelloSpec.scala
`-- target
    `-- streams
        `-- $global
            |-- ivyConfiguration
            |   `-- $global
            |       `-- streams
            |           `-- out
            `-- projectDescriptors
                `-- $global
                    `-- streams
                        `-- out
Sbt created nice basic project structure and filled it with boilerplate code. Main project folder is hello and contains two important pieces: build.sbt file and src/ folder with your Scala program. If you enter the folder and run sbt from it, you should be directed to sbt shell, which will allow you to compile, run or test your code.
> sign is sbt shell prompt. You can run scala from it simply by typing console:
[mdyzma@devbox mdyzma]$ cd test/hello/
[mdyzma@devbox hello]$ sbt
[info] Loading project definition from /home/mdyzma/test/hello/project
[info] Updating {file:/home/mdyzma/test/hello/project/}hello-build...
[info] Resolving org.fusesource.jansi#jansi;1.4 ...
[info] Done updating.
[info] Compiling 1 Scala source to /home/mdyzma/test/hello/project/target/scala-2.10/sbt-0.13/classes...
[info] Set current project to Hello (in build file:/home/mdyzma/test/hello/)
> console
[info] Starting scala interpreter...
[info]
Welcome to Scala 2.12.1 (OpenJDK 64-Bit Server VM, Java 1.8.0_131).
Type in expressions for evaluation. Or try :help.

scala> 2+2
res0: Int = 4

scala>
Type Ctrl+D (Ctrl+Z on Windows) to exit scala REPL and go back to the sbt shell.
It is also possible to run and test your code:
> run
[info] Updating {file:/home/mdyzma/test/hello/}root...
[info] Resolving jline#jline;2.14.1 ...
[info] Done updating.
[info] Compiling 1 Scala source to /home/mdyzma/test/hello/target/scala-2.12/classes...
[info] Running example.Hello
hello
[success] Total time: 5 s, completed April 23, 2017 6:53:19 PM
> test
[info] Compiling 1 Scala source to /home/mdyzma/test/hello/target/scala-2.12/test-classes...
[info] HelloSpec:
[info] The Hello object
[info] - should say hello
[info] Run completed in 283 milliseconds.
[info] Total number of tests run: 1
[info] Suites: completed 1, aborted 0
[info] Tests: succeeded 1, failed 0, canceled 0, ignored 0, pending 0
[info] All tests passed.
[success] Total time: 3 s, completed April 23, 2017 6:53:40 PM
Kernels installation
Jupyter notebook is a fantastic tool, that allows my favorite programming style: Prototype driven development. Existence of REPL (Read, Evaluate, Print Loop) in all installed languages can be used to instantaneously test our code. We can also test our tests. This makes commits cleaner and faster. After all - it is much easier to control very small chunks of the code and work on it interactively. First IPython notebook made it possible with python, but later Jupyter project began to live own life and extended functionality by adding more languages it could “manage”. It is done by specific middle-ware called “kernel”. There is nearly 100 different kernels now(see here). Lets get Big Four.
Ipykernel (additional python)
In many Linux distributions python 3.x is accessible from python3 command, but it is cumbersome to manage both python versions and their dependencies by calling specific pip/pip3 or python/python3 from the system level. Managing versions, as well as third party dependencies and environmental variables is very, very confusing. Unless one uses correct tool. Anaconda has such tool out of the box and it is called conda. It is able to manage packages and virtual environments. With minimal effort one can create and delete entire environments with specific python and packages configuration. Other, very popular environment manager is virtualenv especially with additional package virtualenvwrapper. I will use manager built in conda. More about conda virtual env capabilities here or in built in help system conda env --help.
So…. I have Anaconda 3 with Python 3.6.1 on my Fedora machine. Let’s say I want to install additional python interpreter from 2.7 branch (last 2.x branch supported by Python Foundation). In order to create environment with specific python version, run this command:
[mdyzma@devbox mdyzma]$ conda create --name py27 python=2 ipykernel

Fetching package metadata .........
Solving package specifications: .

Package plan for installation in environment /opt/conda/envs/py27:

The following NEW packages will be INSTALLED:
...

Proceed ([y]/n)? y
...

#
# To activate this environment, use:
# > source activate py27
#
# To deactivate this environment, use:
# > source deactivate py27
#
This should install bunch of packages, including latest python 2 version with basic tools to manage packages in new environment. I also specified, that I want ipykernel package to be installed as well. Now I have to activate new environment following conda help from the screen:
[mdyzma@devbox mdyzma]$ source activate py27

(py27) [mdyzma@devbox mdyzma]$
Prompt changed, indicating that I am now in py27 environment with its packages. Quick pip list reveals, that only handful of basic packages (including ipykernel and its dependencies) were installed :
[mdyzma@devbox mdyzma]$ pip list
DEPRECATION: The default format will switch to columns in the future. You can use --format=(legacy|columns) (or define a format=(legacy|columns) in your pip.conf under the [list] section) to disable this warning.
decorator (4.0.11)
ipykernel (4.6.1)
ipython (6.0.0)
ipython-genutils (0.2.0)
jedi (0.10.2)
jupyter-client (5.0.1)
jupyter-core (4.3.0)
pexpect (4.2.1)
pickleshare (0.7.4)
pip (9.0.1)
prompt-toolkit (1.0.14)
ptyprocess (0.5.1)
Pygments (2.2.0)
python-dateutil (2.6.0)
pyzmq (16.0.2)
setuptools (27.2.0)
simplegeneric (0.8.1)
six (1.10.0)
tornado (4.5.1)
traitlets (4.3.2)
wcwidth (0.1.7)
wheel (0.29.0)
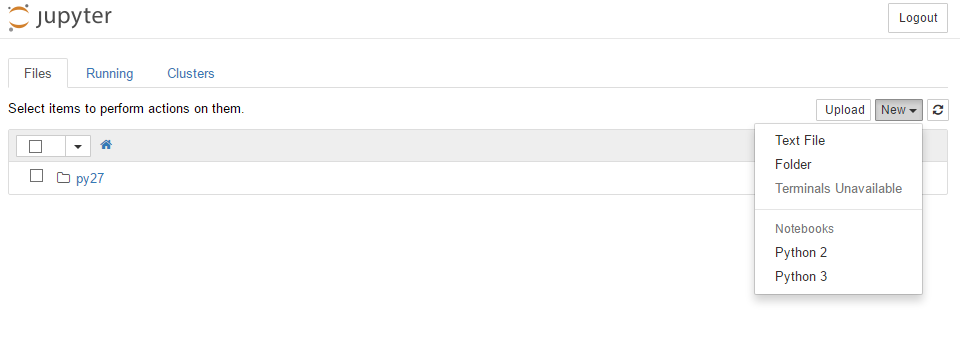
(py27) root@fc954edb0a6d:/#After activation I have to add this kernel to the global list of kernels managed by Jupyter package from main Anaconda installation. To register this kernel I have to enter: python -m ipykernel install --user in the terminal with this kernel activated:
(py27) [mdyzma@devbox mdyzma]$ python -m ipykernel install --user
Installed kernelspec python2 in /home/mdyzma/.local/share/jupyter/kernels/python2
Done.I should have both kernels accessible when I run my Jupyter Notebook:
IRkernel with conda
Continuum Analytics did great job making R language available almost out of the box. Conda can access different repositories by specifying --chanel or -c flag when calling install option. Continuum is maintaining repository with most popular R packages ported, so they can be used as python packages. To install R packages for conda enter:
conda install --channel r r-essentialsThis command should install dozens of R packages and will make R kernel available to you when you run Jupyter Notebook. For more information go to R with conda.
Simple and efficient. To run R code in Jupyter notebook simply choose R kernel from the drop-down list:
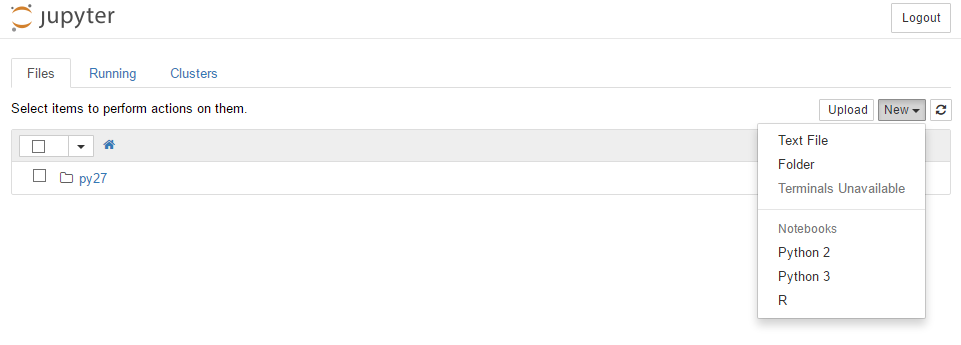
Con of this method is that you have to install nearly 160 packages, taking few gigs of space. On the other hand I will have nice and ready to go R environment in my python after typing just five words. Awesome!
If you want to see alternative way (much less space hungry) check next section.
IRkernel from R
We will soon submit the IRkernel package to CRAN. Until then, you can install it via the devtools package:
install.packages(c('repr', 'IRdisplay', 'crayon', 'pbdZMQ', 'devtools', 'stringr'))
devtools::install_github('IRkernel/IRkernel')
IRkernel::installspec()  # to register the kernel in the current R installation
Effect is identical to the one R will install requested packages
IJulia kernel
Once you have Julia installed on your machine, run Julia app (you will see fancy prompt by julia>), then type:
julia> Pkg.add("IJulia")
INFO: Initializing package repository /home/mdyzma/.julia/v0.7
INFO: Cloning METADATA from https://github.com/JuliaLang/METADATA.jl
INFO: Cloning ...
INFO: Installing ...
INFO: Building ...
Julia package manager will take care of dependencies and download requested software. Specifically it will download and install basic python environment based on Miniconda, which will be local for Julia, and accessible only by Julia. Thanks to that you don’t really need any python installed in your system to run Julia Notebook. In that case only one kernel will be available. Julia will use its private python interpreter and minimal Jupyter installation to run notebook with it’s kernel. You can run it at any time typing in Julia REPL:
julia> using IJulia
INFO: Precompiling module IJulia.

julia> notebook()
Since I already had two additional kernels installed (python 2, and R), IJulia will be added to the collection.
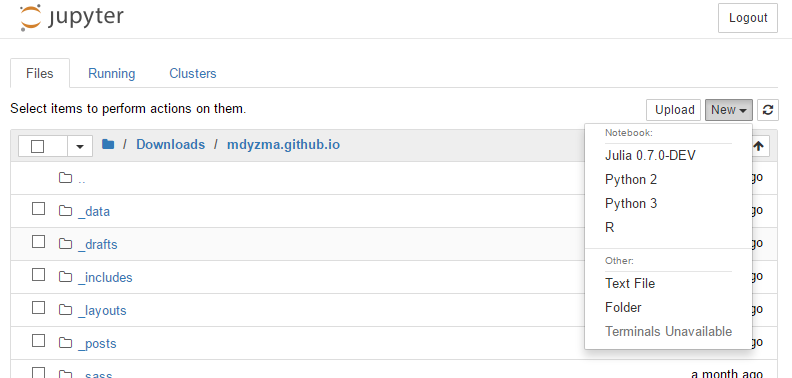
conda update --all), including Jupyter notebook, which changed little bit its UI. You may notice that list of kernels is displayed first. Opposite to previous screen-shots.
In Julia language using <package Name> is an import statement, which pre-compiles and gets ready to work module/program denoted in the statement. Next line calls this programs subroutine called notebook. If you use some arguments, you can modify notebooks behavior. For example notebook(detached=true), Julia will run notebook server in the background and you will be able to use or exit REPL without closing the notebook.
By default, the notebook “dashboard” opens in your home directory, but you can open the dashboard in a different directory with notebook(dir="/some/path").
But we want to add IJulia kernel to existing Jupyter installation. to do that you need to set environmental variable JUPYTER to the value of your current jupyer program path before running Pkg.add("IJulia").
IScala kernel
We will clone one of the kernels offering Scala support from GitHub:
[mdyzma@devbox mdyzma]$ git clone https://github.com/jupyter-scala/

Cloning into 'jupyter-scala'...
remote: Counting objects: 2129, done.
remote: Total 2129 (delta 0), reused 0 (delta 0), pack-reused 2129
Receiving objects: 100% (2129/2129), 405.59 KiB | 837.00 KiB/s, done.
Resolving deltas: 100% (758/758), done.
Simply run sh script prepared by the author and Scala should be added to the list of available kernels:
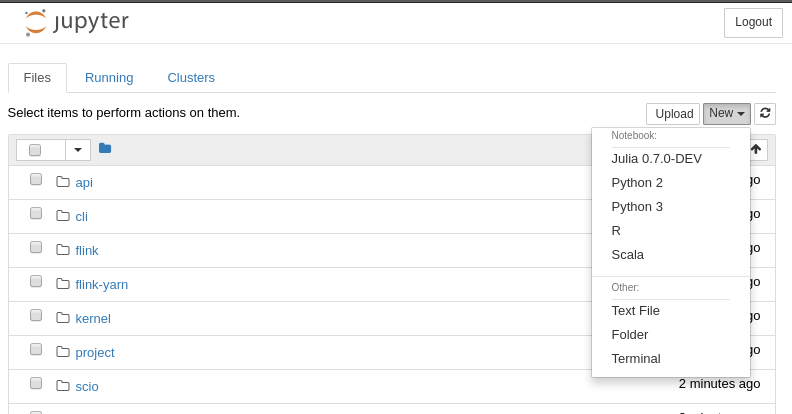
Once all kernels are installed, you can print all available kernels using Jupyter function:
[mdyzma@devbox mdyzma]$ jupyter kernelspec list
Available kernels:
  julia-0.7    /home/mdyzma/.local/share/jupyter/kernels/julia-0.7
  python2      /home/mdyzma/.local/share/jupyter/kernels/python2
  scala        /home/mdyzma/.local/share/jupyter/kernels/scala
  ir           /home/mdyzma/anaconda3/share/jupyter/kernels/ir
  python3      /home/mdyzma/anaconda3/share/jupyter/kernels/python3
Unfortunately those kernels are not connected. In current configuration only one kernel is accessible. Jupyter supports nearly 100 scripting languages, but each notebook is allowed to use only single kernel. Moving data between kernels is not possible. This is why notebooks are usually used sequentially. It means, that changing kernel during computation may not be possible for all kernels. Python kernel is able to use ipython magic functions to switch kernels from cell to cell, Julia has very useful packages - pycall and rcall, which allow to execute native code in this languages. Only R kernel has no connections outside, and it’s usage as a base and execute other kernel is impossible without complicated serialization and deserialization system.
To sum up, it is possible to use other kernels in python and Julia based notebooks. But this functionality is limited.
One to bind them all
There is initiative of Vatlab called SoS notebook. A kernel capable of translating other kernels data structures and functions to perform truly multi-language analysis in one notebook document.
<iframe width=”560” height=”420” src="https://youtu.be/xrwhNMRTBp4"></iframe>
Summary
Now we have versatile, multi-language prototyping environment in the browser.
If you struggle between using python Julia, Scala or R, don’t! Use all of them! At the same time in the same notebook, passing data structures between languages and perform analysis with the best tools they can offer. With Jupyter notebook it is all possible. It is possible to add even more players to the game. Julia, Haskel, Lua, bash, Octave… Pick whatever you can… Currently Jupyter supports nearly 100 different kernels (check here).