Social media analysis with Flask, Part I

Flask application presenting social media accounts analysis in form of dashboard. It transforms various data sources into clear and concise report. This part describes backbone of the application, which is basic Flask configuration, Travis Continuous Integration (with tests) and Heroku Continuous Deployment to multiple environments with a single button. It is under version control, tested and CI/CD ready.
Series consists of:
- Social media analysis with Flask, Part I (Setting environment, flask, Travis CI/Heroku CD )
- Social media analysis with Flask, Part II (Templates, login/register mechanism, data storage)
Part I
- Application description
- Setting up a development environment
- Basic file structure
- Documentation
- Setting Flask application
- Heroku deployment
- Continuous integration
- Summary
Application description
Web application displaying summary of the social media account analysis. Analyzed properties include:
- time-line statistics
- posts semantic analysis
- account followers list (names, number of connections)
- account friends list (names, number of connections)
- followers graph
- friends graph
- friends/followers cross-check between different services
Roles specification
Story to implement: As a user I want to see results of my social media account analysis in form of dashboard page. Steps:
- I go to “/” page
- I see “Landing page” with “sign in” and register” buttons
- I press “sign in” button
- I am redirected to “/signin” page
- I enter credentials
- I am redirected to “/dashboard/user”
- I press Register” button
- I am redirected to “/register” page
- I enter credentials
- I am redirected to “/dashboard/user” page
- I see “Connect
account" button, where SocialMediaName is i.e. Twitter, Facebook, GitHub or LinkedIn - I follow oAuth flow authorization
- I get redirected to “/dashboard/user/[SocialMediaName] page
- I see :
- timeline statistics (number of my posts, % of posts wit response etc.)
- general assessment of all my posts (positive, neutral, negative)
- social network analysis i.e. followers and/or friends statistics (counts of both groups)
- a drop-down menu to display list of my:
- if applicable - followers. Each contains:
- A name i.e. Twitter handle, like “@foo” or Facebook screen name
- A number of followers following this person
- A number of my followers, that this person follows (example, Bob and Rick follow me, Andrew follows both of them, the number is 2).
- if applicable - my friends, each contains:
- A Twitter handle, like “@foo” or Facebook screen name
- A number of friends of this person
- Common friends number
- if applicable - followers. Each contains:
- followers graph (users as nodes, connections as edges)
- friends graph (users as nodes, connections as edges)
- I can export chosen list to the JSON or CVS file
- I can export chosen graph to JSON or CVS
- I can log out from the session
- When I log out I am directed to “/” page
- When I am logged in I can see my user settings link and display it in “/user/name” address
Other requirements
- Application should be Heroku-deployable (please provide a link to the working deployment in the README).
- Application should be documented.
- Quick-start guide to deploy own version of the application
- User manual how to operate deployed application
- Application should be tested (min 90% test coverage)
- Application should be Version controlled (git)
Setting up a development environment
Make sure that Python is installed. After Python we have to make sure we have all necessary packages. Simple pip list will show all installed packages. New Python distributions come with basic package manager pip and tools helping in packages distribution: setuptools and wheel.
[mdyzma@devbox ~]$ pip list
DEPRECATION: The default format will switch to columns in the future. You can use --format=(legacy|columns) (or define a format=(legacy|columns) in your pip.conf under the [list] section) to disable this warning.

pip (9.0.1)
setuptools (36.2.0)
wheel (0.30.0a0)
Another very important tool is virtualenv, which will help us to deal with dependency issues. Virtualenv makes it easy to control which versions of Python as well as the third-party packages are used by the project. Another consideration is that installing packages system-wide generally requires elevated privileges (sudo pip install bazz). By using virtualenvs, you can create Python environments and install packages as a regular user. But first virtualenv must be install in your system Python:
[mdyzma@devbox ~]# sudo pip install virtualenv
Collecting virtualenv
  Downloading virtualenv-15.1.0-py2.py3-none-any.whl (1.8MB)
    100% |################################| 1.8MB 290kB/s
Installing collected packages: virtualenv
Successfully installed virtualenv-15.1.0
Virtual environments management
Now that we have the proper tools installed, we are ready to create our first Flask application. First of all we need virtual environment specific for our application. It is a good practice to separate environment’s working directory (with all installed packages) and application folder, simply to avoid putting heavy folders under version control. Some virtual environments can have hundreds of MB and there is no use to keep track of them. Alternatively we can create virtual environment in projects folder and add this folder to the .gitignore file. What I usually do is to create separate .envs folder in user’s home directory and keep all virtual envs there.
[mdyzma@devbox /]$ virtualenv ~/.envs/md_analytics
New python executable in /home/mdyzma/.envs/md_analytics/bin/python2
Also creating executable in /home/mdyzma/.envs/md_analytics/bin/python
Installing setuptools, pip, wheel...done.
Now we can activate md_analytics virtual environment:
[mdyzma@devbox /]$ source ~/.envs/md_analytics/bin/activate
(md_analytics) [mdyzma@devbox /]$
From now on, whenever we want to work on our app and environment is not activated, we have to activate it first. Changed prompt will inform us that now we use “local” python. All packages installed in active environment will be connected to it. To deactivate environment simply type source deactivate.
Basic file structure
It is not required from Flask application to follow particular folder structure like Django application. Only thing is, files should keep names understood by Flask. Although it is not required, it is advised to structure app a bit to ensure maximum modularity and speed up development, testing etc. Our app structure comprises of three large parts:
- docs - package documentation linked to ReadTheDocs
- app module - the app itself wih login, register and dashboard , user components
- requirements - dependencies for each environment
- tests - suit of test for entire app
- boilerplate files for version control, coverage metrics and deployment
General structure is listed below:
(md_analytics) [mdyzma@devbox md_analytics]$ tree .
.
|
|-- docs/
|   |-- make.bat
|   |-- Makefile
|   `-- source/
|       |-- _static/
|       |-- _templates/
|       |-- conf.py
|       `-- index.rst
|
|-- app/
|   |-- static/
|   |-- templates/
|   |-- __init__.py
|   |-- app.py
|   `-- settings.py
|
|-- requirements/
|   |-- dev.txt
|   `-- prod.txt
|
|-- tests/
|   `-- app/
|       |-- test_app.py
|       `-- test_settings.py
|
|-- __init__.py
|-- .gitignore
|-- .travis.yml
|-- app.json
|-- LICENSE
|-- manage.py
|-- Procfile
|-- Procfile.windows
|-- README.md
`-- requirements.txt
Most of the files in this make up are self-explanatory. There are some files like app.json or Procfilewhich are elements of Heroku machinery and will be described in detail later. Rest belong to the elements of VCS or CI and ensure smooth development. Table with files description is given below:
| File | Description | |
|---|---|---|
| app.json | Orchestrates steps involved in automatic deployment to Heroku. | |
| Procfile | Declares commands run by application on the Heroku platform. | |
| manage.py | Entry-point for executing our application | |
| .travis.yml | Instructions for TravisCI service | |
| docs/conf.py | Sphinx configuration | |
| app/app.py | Flask app factory | |
| app/settings.py | Flask application configuration variables |
GitHub
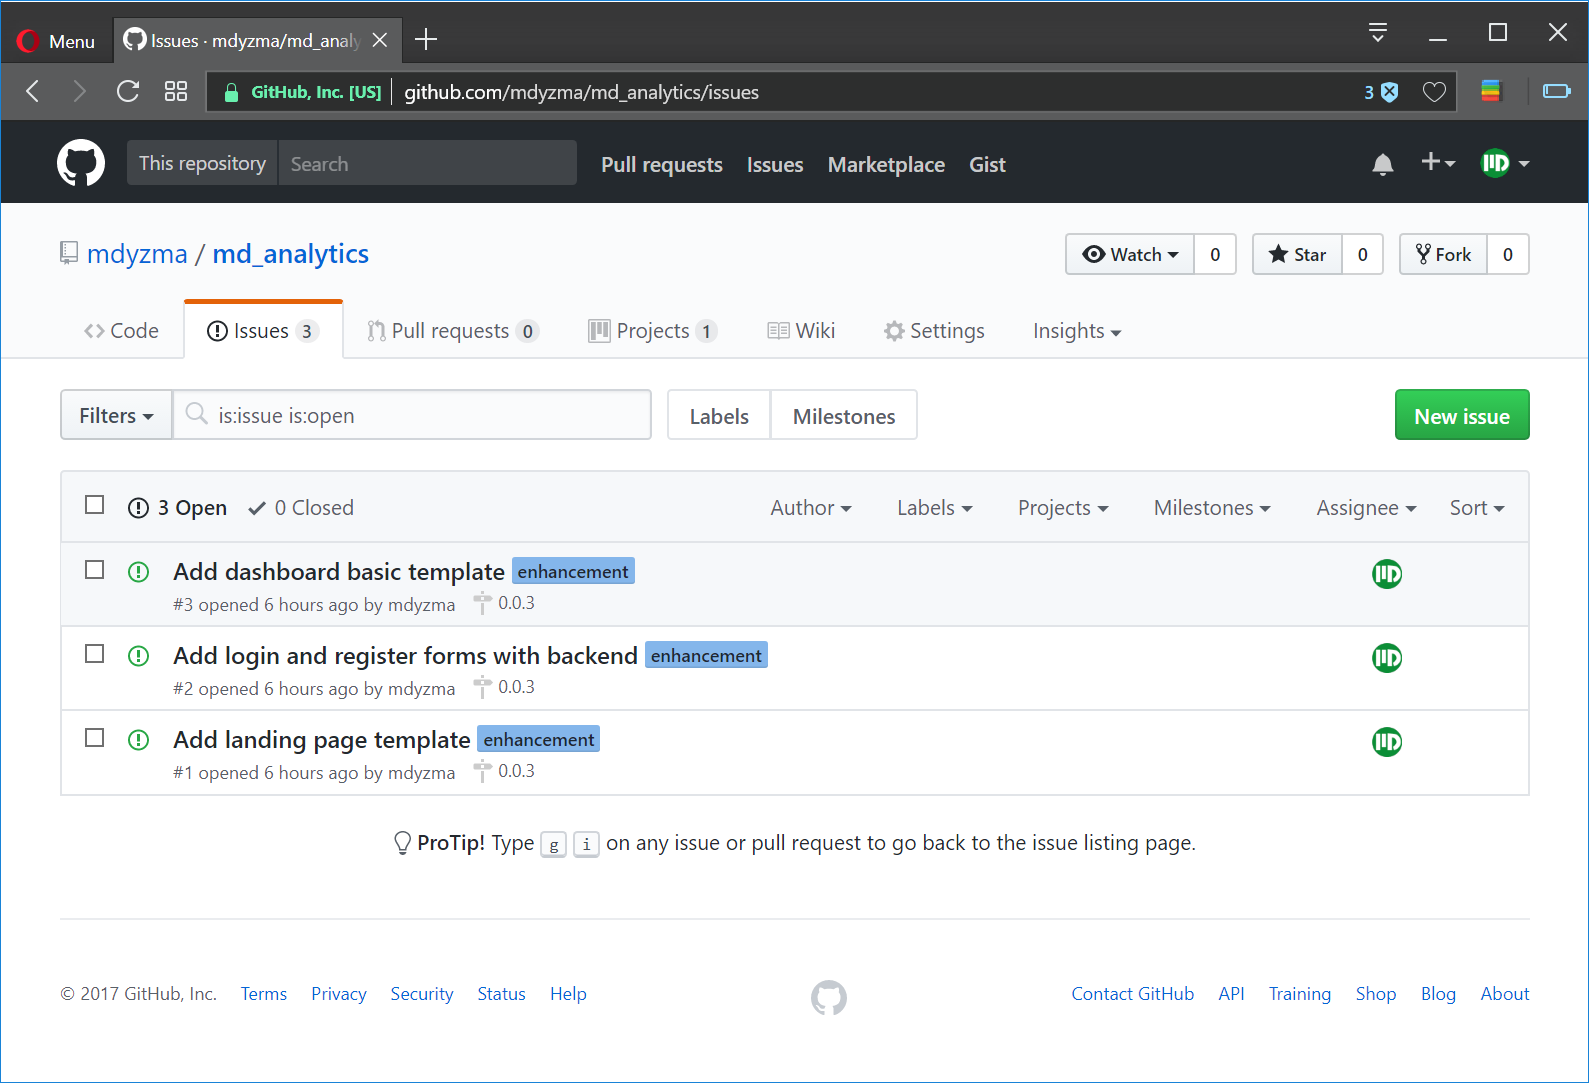
We use git to version control. Basics of git are beyond the scope of this article. Please refer to excellent git tutorial. Here I would like to focus on GitHub aspects related to project management. GitHub offers issues and projects support. Issues are more about specific bugs or features reported by users/developers, while project shows general status of the work progress. Issues can be grouped in milestones, which usually denote specific software release. Very useful for time management.
Here are some issues, which are “enhancements” of the app from current version v0.0.2 (working skeleton integrated with Travis and Heroku) to the pre-released alpha with landing page and dashboard functionalities v0.0.3.
Documentation
Project’s documentation is place in docs folder and is based on excellent Python Sphinx module. Folder is linked to ReadTheDocs, so that every change in GitHub repository initiates documentation rebuild. Hearth of the documentation is conf.py file, where all extensions and static pages generator properties are configured. To manually start rebuild type:
Creating basic documentation stub out of the box.
(md_analytics) [mdyzma@devbox docs]$ sphinx-quickstart
Welcome to the Sphinx 1.6.3 quickstart utility.

Please enter values for the following settings (just press Enter to
accept a default value, if one is given in brackets).

...
Creating file ./source/conf.py.
Creating file ./source/index.rst.
Creating file ./Makefile.
Creating file ./make.bat.

Finished: An initial directory structure has been created.

You should now populate your master file ./source/index.rst and create other documentation
source files. Use the Makefile to build the docs, like so:
   make builder
where "builder" is one of the supported builders, e.g. html, latex or linkcheck.
Following quick-start help, lets build basic html documentation:
(md_analytics) [mdyzma@devbox md_analytics]$ make html

Running Sphinx v1.5.6
making output directory...
loading pickled environment... not yet created
building [mo]: targets for 0 po files that are out of date
building [html]: targets for 1 source files that are out of date
updating environment: 1 added, 0 changed, 0 removed
reading sources... [100%] index
looking for now-outdated files... none found
pickling environment... done
checking consistency... done
preparing documents... done
writing output... [100%] index
generating indices... genindex
writing additional pages... search
copying static files... done
copying extra files... done
dumping search index in English (code: en) ... done
dumping object inventory... done
build succeeded.

Build finished. The HTML pages are in build/html.
Content is written in reStructuredText markup language. For more check here.
Setting Flask application
Setting flask app is a multi-step process, which can be automated with some awesome python tools like cookiecutter, but here we will go step by step to learn it in detail. First we have planed basic application structure, now let’s install Flask and test installation, then create automatic configuration mechanism, semi-automatic dependencies installation and finally continuous integration and deployment of the app on TravisCI and Heroku. All tested and under version control (on GitHub).
Install Flask
Activate virtual environment and install Flask locally (command bellow will install this package and it’s dependencies):
(md_analytics) [mdyzma@devbox /]$ pip install Flask
Collecting Flask
  Downloading Flask-0.12.2-py2.py3-none-any.whl (83kB)
    100% |################################| 92kB 388kB/s
    ...

Successfully installed Flask-0.12.2 Jinja2-2.9.6 MarkupSafe-1.0 Werkzeug-0.12.2 click-6.7 itsdangerous-0.24
Flask and its dependencies were installed. It is good to keep requirements in separate file, to ensure all necessary packages can be installed automatically with a single command and to not pollute application directory.
Currently we have enough to run basic flask application. To test our environment lets write “Hello Flask” tryout. It will use basic routing mechanism to show “Hello Flask!” on the page. First Create app package (with __init__.py) and app.py module in it. In the app.py file type:
app/app.py
from flask import Flask

app = Flask(__name__)

@app.route('/')
def index():
    return 'Hello, Flask!'

if __name__ == '__main__':
    app.run(debug=True)
This “toy” code creates instance of Flask class which is the central object in any Flask project. It has all utilities necessary to start dynamic WSGI app. Running it will initiate local server with single route “/” answering all requests. Name of the view is index, since it is default name, that is looked up by all browsers. When we enter domain address (127.0.0.1:5000 in this case) flask will make sure that index view is presented in response. Index view is whatever stands after index() function return statement. If statement at the end of the file is Python convention that ensures that the app will run properly when it is called as a Python script from bash.
(md_analytics) [mdyzma@devbox app]$ python app.py
 * Running on http://127.0.0.1:5000/ (Press CTRL+C to quit)
 * Restarting with stat
 * Debugger is active!
 * Debugger PIN: 137-812-343
 127.0.0.1 - - [07/July/2017 13:19:25] "GET / HTTP/1.1" 200 -
 127.0.0.1 - - [07/July/2017 13:19:26] "GET /favicon.ico HTTP/1.1" 404 -
… should start server on http://127.0.0.1:5000/ saying Hello, Flask! Main page was served properly (code 200) and because we do not have favicon.ico file (yet!), browser could not find it, hence 404 error code. Although it is possible to start Flask application this way, we will use different mechanism in “real app”. This part was just checking if there are any issues with our environment and Flask installation. Luckily it worked! We are ready to create “real” application and real unit tests.
Requirements
Requirements help speeding up application deployment. When source code is cloned from the pubic repository, all application dependencies are grouped in requirements.txt file. Moreover CI services (including Heroku) need requirements file in application root folder to run app properly. The requirements.txt in our application contains link to requirements folder with several files specifying separate sets of dependencies for different environments in which application can run. Link leads specifically to the requirements/prod.txt. However during development we will install packages listed in requirements/dev.txt, which of course includes production dependencies:
(md_analytics) [mdyzma@devbox md_analytics]$ tree .
.
|
|-- requirements
|   |-- dev.txt
|   `-- prod.txt
`-- requirements.txt
Now we will link requirements/prod.txt to the requirements/dev.txt, so that installing development dependencies will also install all required in production (which means when application is accessible for users).
requirements.txt
# requirements.txt

-r requirements/prod.txt
requirements/prod.txt
# requirements/prod.txt

# Everything needed in production
# Flask
Flask==0.12.2

# Deployment
gunicorn==19.7.1

# App command line
Flask-Script==2.0.5
We will add more dependencies while app grows.
requirements/dev.txt
# requirements/dev.txt

-r prod.txt

# Debug
Flask-DebugToolbar==0.10.1

# Test
coveralls==1.1
pytest==3.2.1
pytest-cov==2.5.1

# Documentation
Sphinx==1.6.3
Installing requirements is easy:
(md_analytics) [mdyzma@devbox md_analytics]$ pip install -r requirements.txtCalling main requirements is enough to get application up and running, however for development other packages may be needed (i.e. debug toolbar). In development environment it is better to call:
(md_analytics) [mdyzma@devbox md_analytics]$ pip install -r requirements/dev.txtConfiguration management
Configurations are kept in settings.py in main app folder. It will store different collections of application settings. Basic config class sets just some values common for all dev and production environments. Environment specific settings are set in children classes.
app/settings.py
# -*- coding: utf-8 -*-
import os


class Config(object):
    SECRET_KEY = os.urandom(24)
    APP_DIR = os.path.abspath(os.path.dirname(__file__))  # This directory
    PROJECT_ROOT = os.path.abspath(os.path.join(APP_DIR, os.pardir))
    BCRYPT_LOG_ROUNDS = 13
    ASSETS_DEBUG = False
    DEBUG_TB_ENABLED = False  # Disable Debug toolbar
    DEBUG_TB_INTERCEPT_REDIRECTS = False
    CACHE_TYPE = 'simple'  # Can be "memcached", "redis", etc.


class ProdConfig(Config):
    """Production configuration."""
    ENV = 'prod'
    DEBUG = False
    SQLALCHEMY_DATABASE_URI = 'postgresql://localhost/example'  # TODO: Change me
    DEBUG_TB_ENABLED = False  # Disable Debug toolbar


class DevConfig(Config):
    """Development configuration."""
    ENV = 'dev'
    DEBUG = True
    DB_NAME = 'dev.db'
    # Put the db file in project root
    DB_PATH = os.path.join(Config.PROJECT_ROOT, DB_NAME)
    SQLALCHEMY_DATABASE_URI = 'sqlite:///{0}'.format(DB_PATH)
    DEBUG_TB_ENABLED = True
    ASSETS_DEBUG = True  # Don't bundle/minify static assets
    CACHE_TYPE = 'simple'  # Can be "memcached", "redis", etc.


class TestConfig(Config):
    TESTING = True
    DEBUG = True
    SQLALCHEMY_DATABASE_URI = 'sqlite://'
    BCRYPT_LOG_ROUNDS = 1  # For faster tests
    WTF_CSRF_ENABLED = False  # Allows form testing
We can always add other values like API keys later.
For now I will input configuration manually, but having configuration classes we can tell flask app to manage it dynamically. For example, to set environmental variable APP_SETTINGS which value will be dependent on the environment our app is running. On Heroku server it will be ProdConfig on development environment it will be DevConfig and so on. To set environmental variable in Linux type: export APP_SETTINGS=<NameOfClass> (i.e. export APP_SETTINGS=DevConfig). To make it permanent we should place export statement in ~/.bashrc file. On Windows instead of export we will use set APP_SETTINGS=<NameOfClass>. If we are going to employ environmental variable governing type of configuration, our app.py should change.
Flask app factory
We will use app factory pattern and Flask-Script extension to build our app foundations. The md_analytics/app.py contains Flask factory, which is just a simple function wrapped around Flask object creation. File manage.py from root directory contains application manager with all command-line directives. This way we can create multiple instances of the app, using different parameters (i.e. app settings). It is time to expand our toy “Hello Flask!” example to employ this pattern.
app/app.py
import os
from flask import Flask
from app.settings import ProdConfig
def create_app(config_object=ProdConfig):
app = Flask(__name__)
app.config.from_object(config_object)
@app.route('/')
def index():
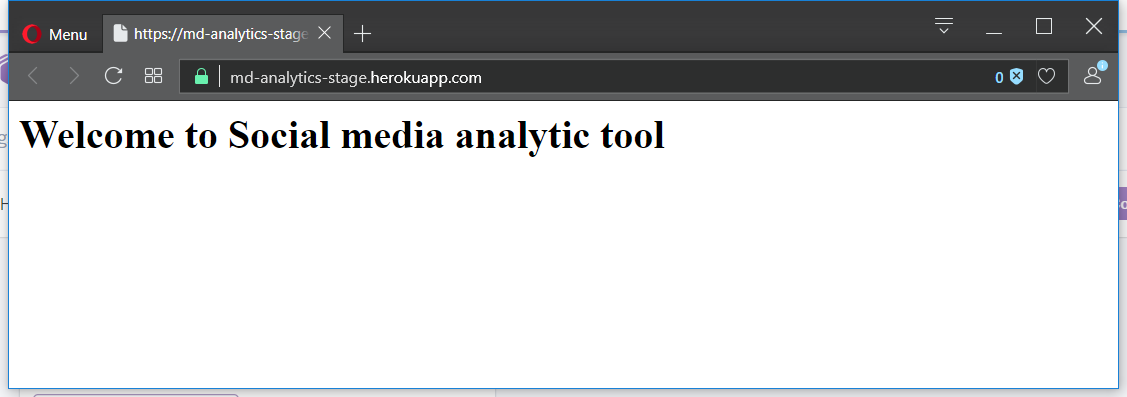
return '<h1>Welcome to Social media analytic tool</h1>'
return appThis application still doesn’t do much, except displaying ‘Welcome to Social media analytic tool’ from index view. It takes production configuration as default, however here we specify to use development environment instead. In next part we will swap <h1> header to landing page and dashboard blueprints. For now simple text is enough to test page routing logic, settings management and deployment.
manage.py
#!/usr/bin/env python
# -*- coding: utf-8 -*-
import os
from flask_script import Manager, Shell, Server
from flask_script.commands import ShowUrls, Clean

from app.app import create_app
from app.settings import DevConfig, ProdConfig

app = create_app(DevConfig)

manager = Manager(app)

manager.add_command("runserver", Server())
manager.add_command("show-urls", ShowUrls())
manager.add_command("clean", Clean())

if __name__ == "__main__":
    manager.run()
File manage.py uses Flask-Script to register command-line tasks outside web application (from bash level). There are several build in commands like Server(), which runs the Flask development server. Still manage.py is not the only way to run our app locally. We can use HerokuCLI to do that (see Heroku deployment). Two additional methods are show-urls and clean. First will show all endpoints for our app, the second will clean all app folders from __pycache__ folders.
Test Flask app
It is time to write some unit tests. This should also clear situation with continuous integration service, which requires test to run smoothly to finish all green. Lets update manage.py to run some tests from command-line. First locate test folder in relation to manage.py and write simple function running tests using excellent Python library pytest. Add following snippet to manage.py:
manage.py
HERE = os.path.abspath(os.path.dirname(__file__))
TEST_PATH = os.path.join(HERE, 'tests')

@manager.command
def test():
    """Run the tests."""
    import pytest
    exit_code = pytest.main([TEST_PATH, '--verbose'])
    return exit_code
This allows to call python manage.py test from the app root directory. Result depends on battery of tests we currently have. Pytest convention places unit-tests in tests directory, which resembles structure of the tested application. Also files should have “test” phrase in the name so that pytest can collect them without any problems. For now we will write three simple tests for our configurations:
tests/app/test_settings.py
"""Test configs."""
from app.app import create_app
from app.settings import DevConfig, ProdConfig, TestConfig


def test_production_config():
    """Production config."""
    app = create_app(ProdConfig)
    assert app.config['ENV'] == 'prod'
    assert app.config['DEBUG'] is False
    assert app.config['DEBUG_TB_ENABLED'] is False


def test_dev_config():
    """Development config."""
    app = create_app(DevConfig)
    assert app.config['ENV'] == 'dev'
    assert app.config['DEBUG'] is True


def test_testing_config():
    """Basic config"""
    app = create_app(TestConfig)
    assert app.config['ENV'] == 'test'
Now we can call test suit via app manager and see results:
(md_analytics) [mdyzma@devbox md_analytics]$ python manage.py test

============================= test session starts =============================
platform linux -- Python 3.6.1, pytest-3.2.1, py-1.4.33, pluggy-0.4.0 -- /home/mdyzma/.envs/md_analytics/bin/python
cachedir: .cache
rootdir: /home/mdyzma/Documents/GitHub/md_analytics, inifile:
plugins: cov-2.5.1
collected 3 items

tests/app/test_settings.py::test_production_config PASSED
tests/app/test_settings.py::test_dev_config PASSED
tests/app/test_settings.py::test_testing_config PASSED

========================== 3 passed in 0.08 seconds ===========================
We can alway launch tests manually:
(md_analytics) [mdyzma@devbox md_analytics]$ python -m pytestAdditionally we can add --cov=app tests/ flag, which indicate source code location and tests location for test coverage package. Flag instructs pytest to create test coverage report, which can be further used by third party software (i.e. Jenkins or special services like coveralls.io).
Having all command line features integrated into one common interface is alway a good thing and helps other developers to understand code and join the project faster. However at this point our application will be tested on TravisCI server using command from .travis.yml (see here).
Heroku deployment
For deployment we will use Heroku service. It is good practice to stage changes first and check consistency and after acceptance tests pass, to promote staged application to the production. Production is “live” application accessible for users. To achieve that we have to create two separate applications. Heroku implemented “quick deploy” button, which is specified in root directory. File app.json contains all information necessary to copy files and deploy application.
app.json
{
  "name": "MD Analytics",
  "description": "Python-Flask app, which displays social media accounts data analysis.",
  "image": "heroku/python",
  "repository": "https://github.com/mdyzma/md_analytics.git",
  "env": {
    "APP_SETTINGS":{
      "description": "Application configuration setting.",
      "value": "ProdConfig"
    }
  },
  "keywords": ["python", "heroku", "social-media"]
}
Another file, we will need is Procfile. It instructs Heroku platform how to run our app. Because Heroku allows to deploy php, js, java, ruby and python applications, we have to be specific what software should be used by platform. We have to be specific also about the location of our running function. We do not need development server on Heroku, therefore we will point it to the place, where WSGI will pick up code execution.
# Procfile - uses gunicorn to launch python app

web: gunicorn app.app:create_app\(\)

# launching app:
# $ heroku local
… and because gunicorn works only on “nix” systems, we need simple app call for windows (in case we want to develop on Windows machine):
# Procfile.windows

web: python manage.py runserver

# launching app:
# $ heroku local -f Procfile.windows
Both should produce following output:
(md_analytics) [mdyzma@devbox md_analytics]$ heroku local

[WARN] No ENV file found
13:31:25 web.1   |  [2017-07-06 13:31:25 +0200] [3400] [INFO] Starting gunicorn 19.7.1
13:31:25 web.1   |  [2017-07-06 13:31:25 +0200] [3400] [INFO] Listening at: http://0.0.0.0:5000 (3400)
13:31:25 web.1   |  [2017-07-06 13:31:25 +0200] [3400] [INFO] Using worker: sync
13:31:25 web.1   |  [2017-07-06 13:31:25 +0200] [3403] [INFO] Booting worker with pid: 3403
App creation can be done via Heroku web interface or command line tool, but first we need to make sure HerokuCLI is installed. Type:
(md_analytics) [mdyzma@devbox md_analytics]$ heroku --version

heroku-cli/6.12.9-d4bf599 (linux-x64) node-v8.1.4
Piece of advice for Fedora users: from my experience it is better to install Heroku official, standalone version, instead of Heroku Ruby gem. It causes less problems.
After successful HerokuCLI installation we can proceed and use it to create two separate applications. I called mine: md-analytics-stage for staging environment, where app undergoes “acceptance tests” and md-analytics for production environment (app released for users). We will do it in three steps:
- Create md-analytics and md-analytics-stage apps
- Create md-analytics pipeline (group of applications sharing same codebase) and add apps to it
- push files manually to Heroku (later CI system will deploy app to the staging environment upon success. Then after inspecting it app can be manually promoted to
md-analytics.
I assume we have an application running on local machine. Lets create applications on Heroku service and bind them with a pipeline. First login to Heroku service:
(md_analytics) [mdyzma@devbox md_analytics]$ heroku login
Enter your Heroku credentials:
Email: mdyzma@gmail.com
Password: ************
Two-factor code: ******
Logged in as mdyzma@gmail.com
Pull GitHub repository. Later on files will be pushed to the created Heroku application manually (once we configure Travis, it will be done automatically):
(md_analytics) [mdyzma@devbox ~]$ git clone https://github.com/mdyzma/md_analytics.git
(md_analytics) [mdyzma@devbox ~]$ cd md_analytics
(md_analytics) [mdyzma@devbox md_analytics]$
Create apps:
# production
(md_analytics) [mdyzma@devbox md_analytics]$ heroku create --region eu --buildpack heroku/python md-analytics
Creating md-analytics... done, region is eu
https://md-analytics.herokuapp.com/ | https://git.heroku.com/md-analytics.git

# ...and stage
(md_analytics) [mdyzma@devbox md_analytics]$ heroku create --region eu --buildpack heroku/python md-analytics-stage
Creating md-analytics-stage... done, region is eu
https://md-analytics-stage.herokuapp.com/ | https://git.heroku.com/md-analytics-stage.git
Order in which apps were created is relevant, because HerokuCLI will add extra remote address to our app’s git. Address will point to the app repository on Heroku, which was created last and we want it to be stage (remember that production promotion is done manually).
(md_analytics) [mdyzma@devbox md_analytics]$ git remote -v
heroku  https://git.heroku.com/md-analytics-stage.git (fetch)
heroku  https://git.heroku.com/md-analytics-stage.git (push)
origin  git@github.com:mdyzma/md_analytics.git (fetch)
origin  git@github.com:mdyzma/md_analytics.git (push)
As we can see in addition to the original GitHub origin repo, we have link to the heroku.
We can also check present apps:
(md_analytics) [mdyzma@devbox md_analytics]$ heroku apps
=== mdyzma@gmail.com Apps
md-analytics (eu)
md-analytics-stage (eu)
When we open our apps in the browser: http://md-analytics-stage.herokuapp.com,m we would see empty apps created by Heroku service. All we have is default Heroku message, that our WSGI python app was launched successfully:
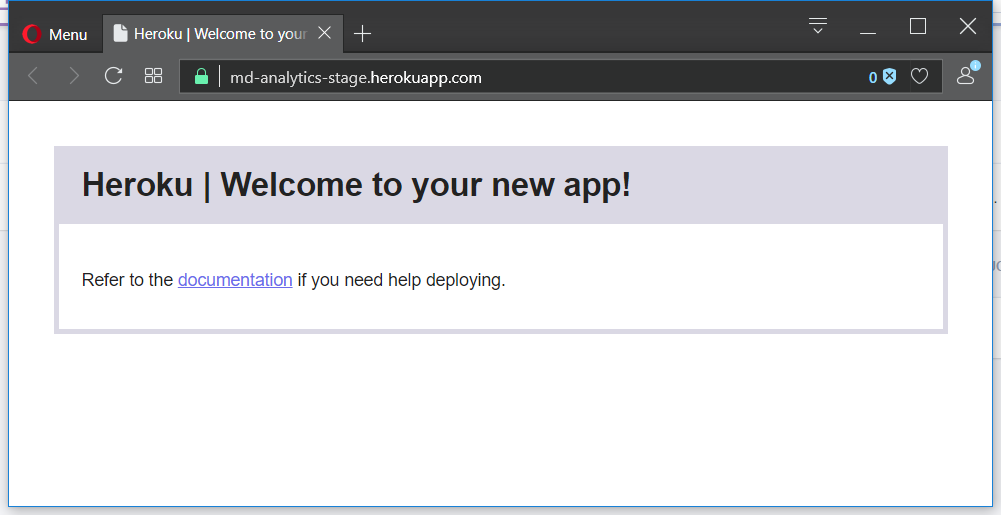
Now we have to set environmental variables and upload application files to the remote location:
(md_analytics) [mdyzma@devbox md_analytics]$ heroku config:set --app md-analytics-stage APP_SETTINGS=ProdConfig
Setting APP_SETTINGS... done
APP_SETTINGS: ProdConfig
To upload files directly from local master branch to remote heroku repo type:
(md_analytics) [mdyzma@devbox md_analytics]$ git push heroku master

git push heroku master
Counting objects: 50, done.
Delta compression using up to 8 threads.
Compressing objects: 100% (45/45), done.
Writing objects: 100% (50/50), 12.04 KiB | 0 bytes/s, done.
Total 50 (delta 12), reused 4 (delta 0)
remote: Compressing source files... done.
remote: Building source:
remote:
remote: -----> Python app detected
remote: -----> Installing python-3.6.2
remote: -----> Installing pip
remote: -----> Installing requirements with pip
...
remote: -----> Discovering process types
remote:        Procfile declares types -> web
remote:
remote: -----> Compressing...
remote:        Done: 49.3M
remote: -----> Launching...
remote:        Released v3
remote:        https://md-analytics-stage.herokuapp.com/ deployed to Heroku
remote:
remote: Verifying deploy... done.
To https://git.heroku.com/md-analytics-stage.git
 * [new branch]      master -> master
And voila! App is running in our stage environment:
After creating apps we can bind hem together in single pipeline. To do it from HeokuCLI we need additional plug-in. Lets install it:
(md_analytics) [mdyzma@devbox md_analytics]$ heroku plugins:install heroku-pipelines
Installing plugin heroku-pipelines... done
Now lets create new pipeline and point specific apps to their environments (HerokuCLI provides nice text interface):
(md_analytics) [mdyzma@devbox md_analytics]$ heroku pipelines:create -a md-analytics-stage
? Pipeline name md-analytics
? Stage of md-analytics-stage staging
Creating md-analytics pipeline... done
Adding md-analytics-stage to md-analytics pipeline as staging... done
And add production app, choosing production stage this time:
(md_analytics) [mdyzma@devbox md_analytics]$ heroku pipelines:add -a md-analytics md-analytics
? Stage of md-analytics production
Adding md-analytics to md-analytics pipeline as production... done
Because app was launched without errors, I will promote staging environment to production.
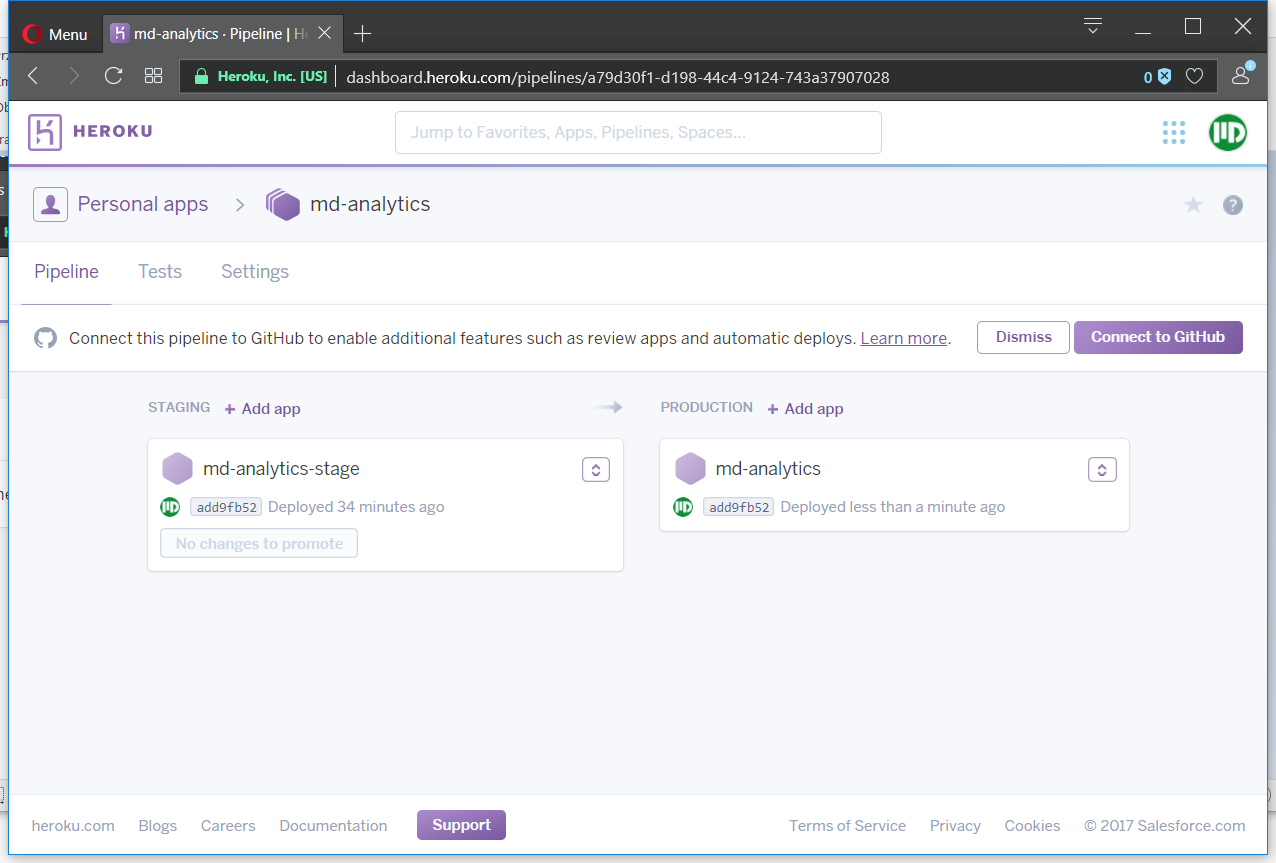
We can also connect Giuthub repository to activate automatic deployment options (with “wait for CI” and “automatic deployment” ticked). If we check Heroku dashboard now we should see:
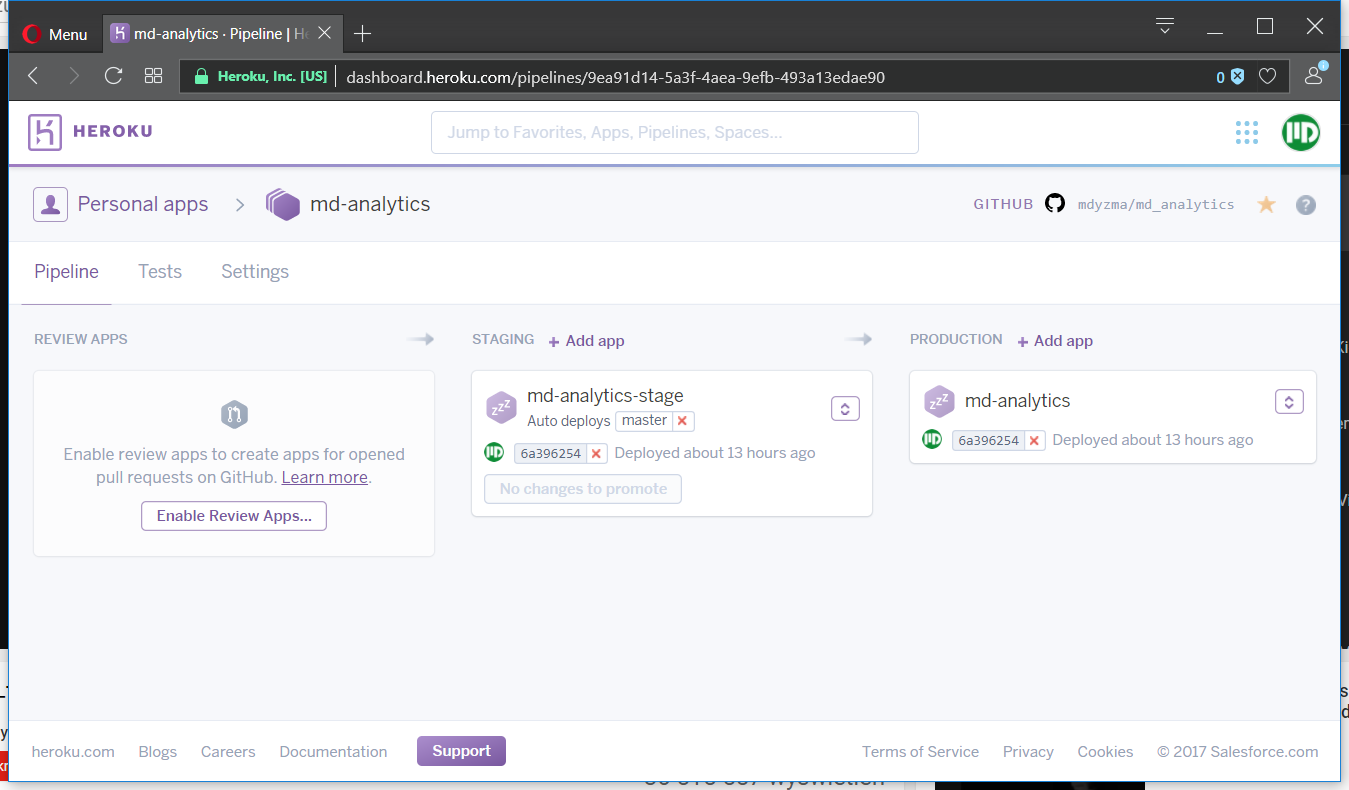
Unfortunately promoting app does not copy environment’s variables, therefore we have to set app specific variables for production as well:
(md_analytics) [mdyzma@devbox md_analytics]$ heroku config:set --app md-analytics APP_SETTINGS=ProdConfig
Setting APP_SETTINGS and restarting md-analytics... done, v4
APP_SETTINGS: ProdConfig
Now both - staging and production environments run Flask app flawlessly.
Continuous integration
We will use TravisCI, but it is also possible to build automatic system with GitLab, Jenkins or BuildBot. There are (or will be) separate articles on this blog describing specific CI/CD options.
To set TravisCI we have to place .travis.yml file in the application root directory. It will contain instructions for TravisCI service what language we use (Python), which versions (2.7, 3.6 and nightly build), how to test application, how to create basic metrics (like test coverage, which will be further processed by Coveralls.io service) and finally how to deploy it to the Heroku upon successfully finishing all steps (for detail description of Heroku deployment, see here). “.travis.yml” file will look similar to this:
.travis.yml
language: python

python:
    - "2.7"
    - "3.5"
    - "3.6"
    - "nightly"

# command to install dependencies
install: "pip install -r requirements/dev.txt"
# command to run tests
script: python -m pytest --cov=app tests/

after_success:
    - pip install coveralls
    - coverage run --source=flask_oauthlib setup.py -q nosetests
    - coveralls

branches:
  only:
    - master

deploy:
  provider: heroku
  api_key:
    secure: hqJqe/oeO5nQuX8WZkuxlu+Vwr/6OJYFCLN3CCSmaJ1LTaaxlqu89b/chj0evLadykgQMHLmsehW6v6WZlR44ZNxqsMRBk3ypn380jTH+4DNBtPQLEV5UySUGGRlKDBg6UHjNUmhb44vypE0+NpdjbEyYfwxjNXJhT3oogVMlOEiUsOfx/Tor9QA54bu92HhKQTvMHmCxzh4vq2e/e/YiB+x1pPFGqVE3G+KlGTBtjF8rRA7alrjfXUqVLS897tKjwJHtGQt84XNEcXPijlhZSk+M22LZbGo061oP6emhJBDvKqHcIcwa5pR4i9zVbv3XrLPU3icD7qvkSwvdtxnd6Goz4Ybomy4dB/iat46fWnPS0WUmlDHRFo4iKXQMnFLJ79ET/0/gfRrVi54sM/Dru4opFoh4zjld3lwjSAyoAJFlO61hakjtxAM8L3NVMeuiZvXkKjgFIgfCiLlDpK5xyDUhzLqwcOO5UazHwo/pXD32bJgzPbDHaoF1m1QMEhe4HnzHhQJveqaHHPzIXuImBwEJhrCgZjGLDxGx+D93KNY/dDDFItOOQ3493V2CUKjer35c9NOk6cr2kloDVIg4Qfe9Pzg3w9C5n0dakQuaVpHSEnG+oz6PjIIeIItgnYXzJBF5wvU0dWXUcZWmYiQuhjKwFnAfODDMAfPGXC/Yh8=
  app: md-analytics-stage
YML files are designed to be simple to read by humans. Options are defined using key: value pairs with nested structure. I suppose, the only mysterious part is deploy -> api_key. Lets examine this entry. Once registered to Heroku, I was given API key (Heroku -> account settings). It is unwise to paste your key just like that to the .travis.yml. Therefore we will use Travis ruby gem to encrypt it (must have Ruby installed):
(md_analytics) [mdyzma@devbox md_analytics]$ gem install travis
...
12 gems installed
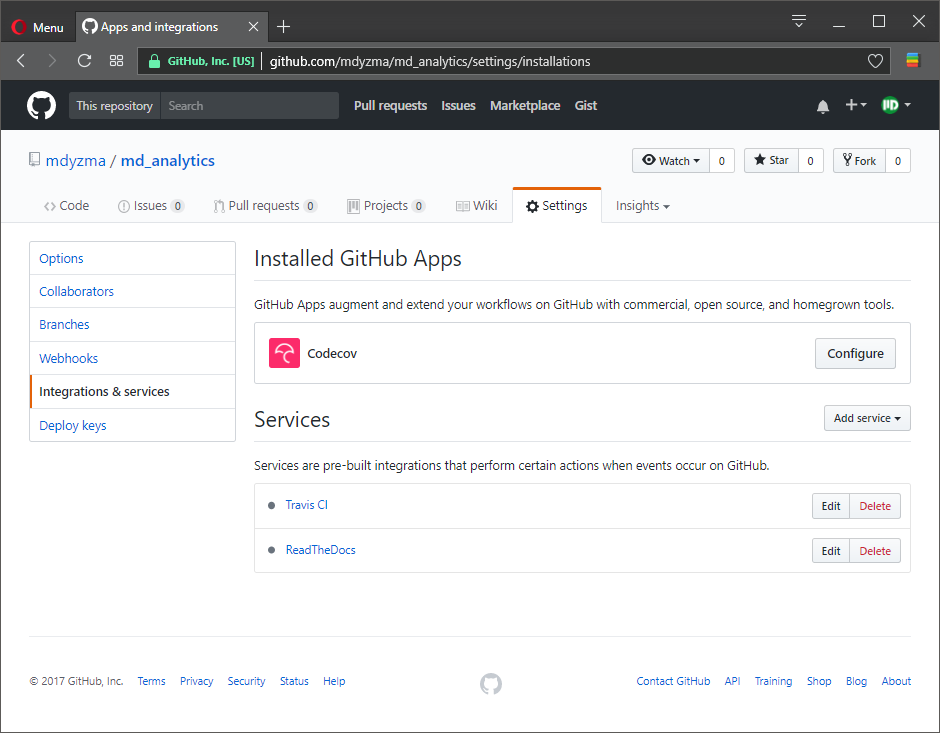
(md_analytics) [mdyzma@devbox md_analytics]$ travis encrypt $(heroku auth:token) --add deploy.api_keyThis appended .travis.yml file with encrypted API token read by HerokuCLI. The only thing left to be done is to connect md_analytics GitHub with TravisCI service:
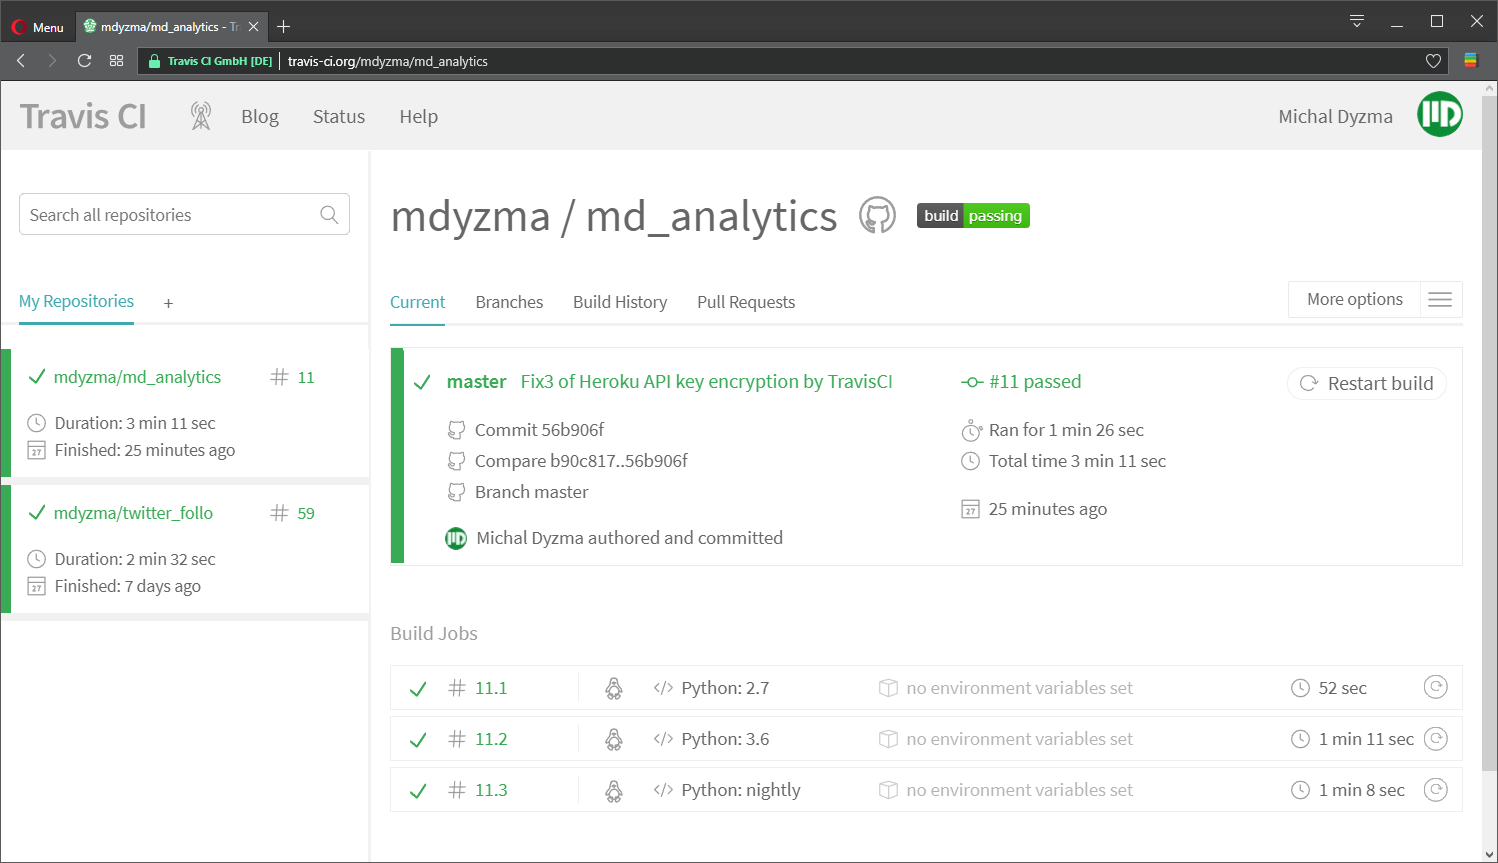
Now when we upload new commit Travis will sense changes and run all tasks described in YML automatically. In this case it should perform tests on three python instances (2.7, 3.6 and 3.7-DEV). In all Python environments it should install requirements and run tests (including test coverage report). Upon success it should deploy our app to the staging environment on Heroku service.
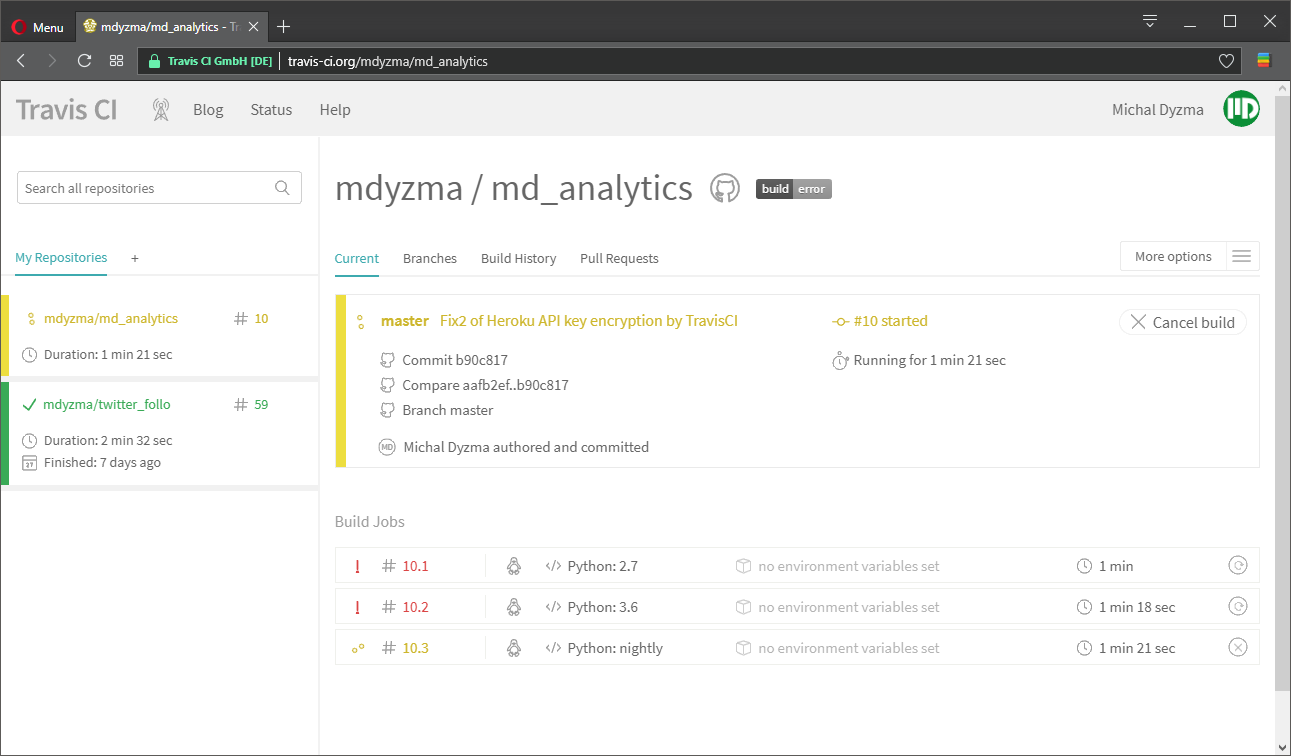
And it failed… We can inspect build console log and track reason. Looks like tests run great, but there is a problem with Heroku deployment. Some error in API key encryption. We used travis ruby gem to extract authorization token and encrypt it with: travis encrypt. Obviously it did not go well.
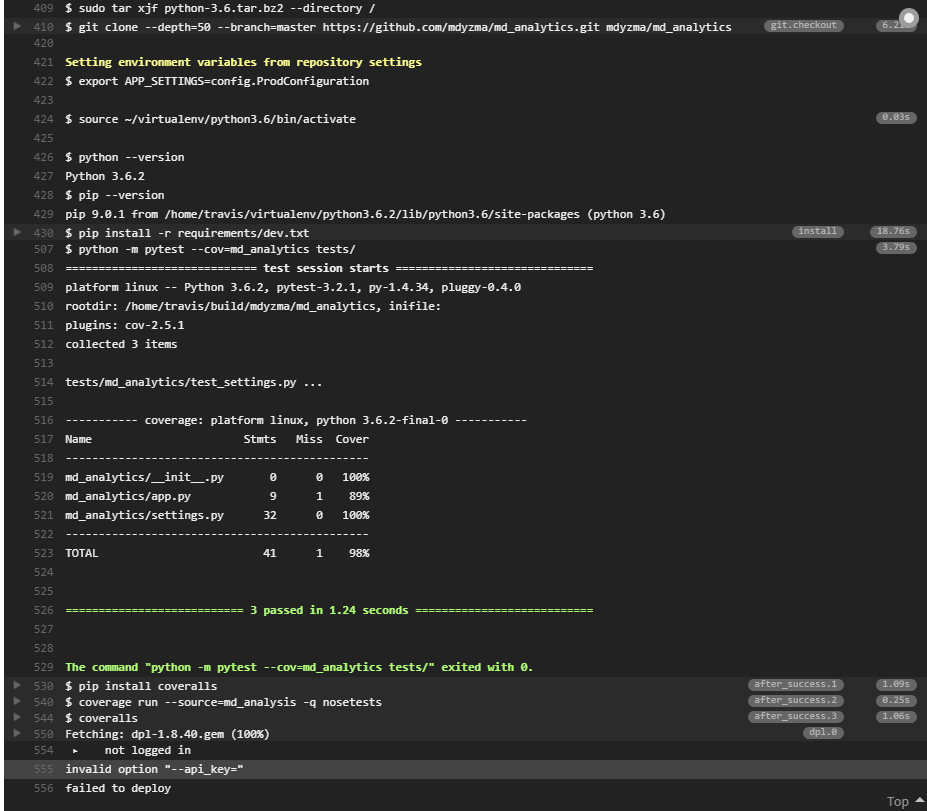
All right. For some reason $(heroku auth:token) returned strange data (need to read more about Heroku authentication mechanism). I have some “initialization” scripts connected to the console and they might have interfered with travisCLI. I had to work around it and provide HEROKU API TOKEN directly:
travis encrypt "[SECRET]" --add deploy.api_key… which fixed deployment problem. According to this GitHub issue another approach could be creating environmental variable HEROKU_API_TOKEN on Travis an paste secret token there.
Summary
What we have is a Flask application with complete continuous integration and continuous deployment work-flow up and running. Basic elements of the system are:
- Code repository placed on GitHub
- TravisCI continuous integration running pytest and passing app further
- Two deployment environments on Heroku: stage and production grouped in one pipeline
To continue: